Make Edible Pilgrim Hats with Grandchildren

Before I get to the meat (or the ’sweet’) of this posting, I’ve just GOT to share photos of some quilts that I’ve made for our daughter-in-law.

Blanket 1 front side

Blanket 1 back side

Blanket 2 Front side

Blanket 2 back side (For some odd reasons the polka dots on the border in this picture look white.  They are actually the green color.  So are the stripes.  Sigh. . .)

I also made another blue and white fleece blanket with the fan fold edging.

Now.  On to the pilgrim hats.

I mentioned a bit back here on my site that I was going to make cake pops for the baby shower that I was giving for our daughter-in-law (who got these quilts).    Then, I planned on writing about my experience.  But it was ugly.  (If you read about it, you’ll come away feeling greatly superior to me because your culinary skills far surpass mine. . .)

Well, before I made the cake pops, I had seen a picture of an edible pilgrim hat.  All it had was a cookie and a marshmallow dipped in melted chocolate.  In my naivety, I though, ‘I can make that.’  Then I made my cake pops.  Well, once burned twice shy as the saying goes.  I didn’t want scabrous hats joining up with my leprosy cake pops.  But I still wanted to make those hats!

So, being the clever person that I am, I came up with my own version.  One that didn’t require dipping of items in melted chocolate.  One that took the minimalist of minimal skills.  Here’s a picture of my creation.

They turned out pretty good.  I even surprised myself at how easy they were and how normal they look.

I purchased shortbread cookies frosted with chocolate and Reese’s Peanut Butter Cups.  I bought frosting in a tube (because I was too lazy to make my own).

I put the frosting in a cake decorating bag that I had (mainly because I thought I could just squeeze the frosting from the tube — it came out looking like it was related to my leprosy pops — and because I was too cheap and lazy to go to the store to buy a decorating tip that fit the tube of frosting.  Whew!  That was a long sentence! )

I smeared some frosting on the top of the peanut butter cup and pressed it onto the cookie.  Then I piped a frosting buckle on and voilà I was done.  In like, less than a minute.  (I spent more time eating the peanut butter cup that jumped into my mouth than I did making the hat!)

I think that I’ll make some to put by each guests’ plate for Thanksgiving Dinner.

This would be a very easy thing for your grandchildren to make on Thanksgiving Day.  It will keep them busy and quiet (as they eat the rejects).  Just make sure you have extra cookies and peanut butter cups on hand!

Two More Baby Quilts

Call me an old fuddy duddy, old fashioned, not with it, and out of sync with all those folks who are young and cool.  I just don’t seem to care for the current colors that are deemed fashionable.  Especially brown.  Brown is a good color for mud, Utah, or even brownies.  But not clothing, especially if it is something that I have a choice in wearing.

Our little granddaughter was given a brown dress with pink polka dots.  I can understand the pink polka dots.  But brown?  For a baby?  Sigh.  And to make it worse, she doesn’t have any choice in what she wears.  She’s at the mercy of her young-and-fashionably-with-it mother.

However, when I went fabric shopping for material to make a quilt for our granddaughter, what ended up in the bag of purchased material that I took home?  Why, brown material with pink polka dots!  It twisted my arm and threatened me with bodily harm if I didn’t buy it.

I do think that there is a Kodak moment in the making — as soon as our granddaughter grows into that brown and pink polka dotted dress.  I’m just hoping that when wearing that dress and we lay her on this quilt, that we will be able to see her.  Maybe she will show up on better on the pink side.

I like the color yellow.  So perky.  So bright.  So cheerful.  So not brown.  When I saw some flannel material with cute bunnies, hearts, and trains, I couldn’t resist it.  Especially when I decided to put yellow flannel on the back.  I had to do something to compensate for buying that brown fabric.

It feels nice to have finished making these baby quilts!

Fan Edging on Baby Blanket

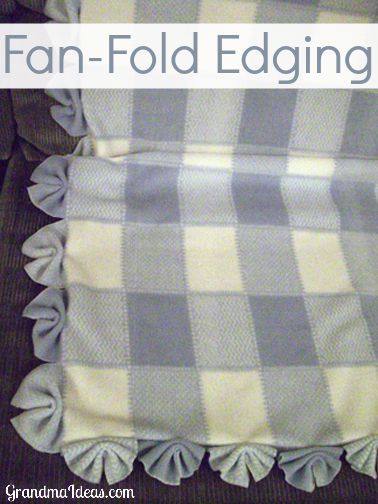
Many of my readers have wondered how to make the baby blanket with the fan edging. So, I thought that I would make a little movie to show how it was done. After all, a picture (movie) is worth a thousand words of explanation!

I have a wonderful friend who is expecting her first baby and I was invited to a shower for her. I decided to make her a baby blanket. You’ve heard the expression ‘killing two birds with one stone.’ Well, I have two birds (purposes) here — make a gift and make a little movie.

I dug out my 30 year old Kenmore sewing machine. It’s as creaky as my knees as you can hear in the movie clip. My cameraman (husband) was trying different things with the camera attempting to get close up views. Some of the filming was fuzzy. Rats! While I might not get an academy award for best filming, at least you will be able to get a better idea of how to do the fan edging. I hope this helps.

Happy sewing!
Digi-Gram

My Third Baby Blanket

What colors come to your mind when you think of baby blankets? Pastel pink? Sky blue? Mellow yellow? Soft green? How about black?

Black?!?! No way!

I found the cutest fabric in a store that specializes in material for babies. And the fabric was black. I debated and debated whether or not to get it. Would I be seen as a morbid mother-in-law? Possibly. But I would hope that those seeing the blanket would not mind the blackness because the design was so delightful.

The design consisted of a variety of brightly colored cats. Cats with an attitude. Cats smirking. Cool cats. Fuschia pink cats. Fire-engine red cats. Lime green cats. Golden sun yellow cats. The coordinating fabric was black with paw prints out of the same colors as the cats.

Our daughter-in-law loves cats and so I immediately thought of her when I saw the fabric. After much internal debate, I couldn’t resist it. Spencer, our grandson, may be wrapped up in the black blanket but I’m hoping it will tickle his mother’s fancy whenever she uses it.

I finished it this week. Here are some pictures of the blanket.

Cat Blanket 1
Front Side
Cat Blanket 3
Back Side
Cat Blanket 2
Up Close

I used a slick method for making it. I sewed the batting to the wrong side of the material with the cats on it. Then, I put the right sides together of the two pieces of fabric. I sewed around the edges leaving about 16 inches. Kind of like sewing a sleeping bag. Then, I turned it right sides out. All I had to do then was to hand stitch the last few inches of it and tie it. This is a faster method than hand stitching around the whole blanket.

This brings the number of blankets that I’ve made for Spencer up to 3. He’s not even 2 months old yet . . . I can’t believe that I’ve made this many! And, I have a sneaking suspicion there will probably be yet more to come . . .

The cat’s meow,
Digi-Gram

Next Page »

Content Protected Using Blog Protector By: PcDrome.